Dread Fortress
Nefra, Who Bars the Way
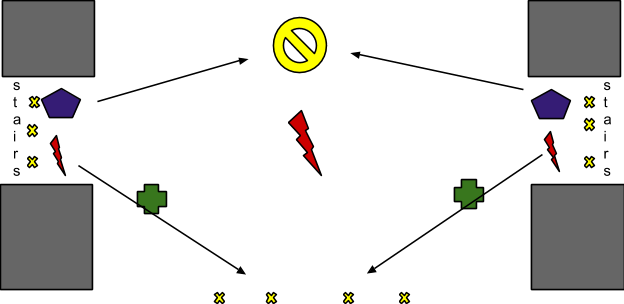
Tanks –Tanks need to both stack in front of the boss to share the cleave damage. If one Tank is targeted by the droids then both tanks need to move, switch back and forth between 2 locations as needed. Tanking against statues is advised. Also, be sure that you have first and second threat. There is a chance that if you do not have second threat he will hit a dps with half of twin attack. Cleanse DoT if able.
DPS– When you’re targeted by the Overloaded Assault Droids, they will run up to you and place a red circle that does a massive amount of damage. If you don’t move, it is possibly enough to one shot you. Other than the red circle you can sit in place and tunnel the boss. Some DPS classes, for example a Sniper, can self cleanse the dot.
Heals- Stack with DPS behind boss. Split tank cleanses (priority cleanse) for mass debuff , then themselves, then dps (since they will be able to cleanse their own every other debuff). Avoid red reticle.

Sniper PoV Vid Sin Tank PoV Vid Sorc Heals PoV Vid
Gatekeeper Draxxus
This boss will periodically jump up/down during multiple add waves. Split dps to make sure that all possible interrupts are covered. Wave composition below.
Tanks- The fourth and sixth wave of adds spawn 2 dismantlers. These Dismantlers have to be tanked one tank on each. When the Dismantlers channel, they need to be tank switched or the tanks get 1 shot. In the 7th and 9th wave of adds, 2 guardians will appear. They both need to be tanked with their backs away from the group as they have a cone aoe that is avoidable once they start the cast. The boss needs to be picked up as well by one of the tanks in waves in 3,5, and 9..
DPS- Your Priority should be killing the Dismantler, Despoiler and Corrupter adds first, Corrupter adds’ Mass affliction needs to be interrupted, it’s a 5s channel . Initially burn the boss for around 10 seconds before he disappears. Waves of adds will begin to spawn based on the previous waves last add death, or boss jump up. Hold off on killing the last add to give healers the chance to catch up, if necessary.
Wave 1: A bunch of Subteroths. Wait for them to be grouped up and AOE them down. They deal splash damage upon death so be aware of that.
Wave 2: 4 Dispatchers and 2 Subteroths. Burn the Dispatchers first.
Wave 3: 4 Dispatchers and 2 Corrupters. Burn/interrupt the Corrupters first and then the Dispatchers. Leave 1-2 Dispatchers, then burn boss.
Wave 4: 2 Dismantlers and 2 Subteroths. All DPS should focus on one of the Dismantlers first and then burn down the other one. Subteroths should only be touched after both Dismantlers are dead.
Wave 5: 4 Dispatchers, 2 Corrupters and 3 Bulwarks. Here the priority should be the Corrupters, Dispatchers and then the Bulwarks. In order to damage the Corrupters or Dispatchers you will need to be in melee range. Leave 1 Bulwark and then burn boss.
Wave 6: 2 Dismantlers, 1 Corrupter, 1 Bulwark and 1 Despoiler. This is probably the trickiest phase. In my opinion the Despoiler needs to be killed first because if he gets his cast off then the boss will be healed to 100%. After the Despoiler is dead then you can focus on the Dismantlers, then the Corrupter, and finally the Bulwark.
Wave 7: 2 Guardians and 2 Subteroths. Choose one of the Guardians to burn down first while being aware not to be in his purple cone when the cast goes off.
Wave 8: 4 Corrupters, 1 Despoiler, 2 Bulwarks. Burn down the Despoiler first before you kill the Corrupters and then finally the Bulwarks.
Wave 9: 2 Guardians, 2 Dispatchers and 1 Corrupter. Kill the Corrupter first followed by the Dispatcher and then the Guardians. After initial 15 secs, burn boss.
Heals- Split tanks between healers and well as right vs. left sides. AoEs will be difficult to cast as raid members need to spread in order to avoid Corrosive Grenade splash debuff. I found that during side add phases i would position between the tanks and ranged dps.
WAVE COMPOSITION
Wave 1 Subteroths only
Wave 2 Dispatcher x4 Subteroth x2
Wave 3 Dispatcher x4 Corrupter x2 Boss
Wave 4 Dismantler x2 Subteroth x2
Wave 5 Dispatcherx4 Corrupterx2 Bulwarkx3 Boss
Wave 6 Dismantler x2 Corrupter x1 Bulwakr x1 Despoiler x1
Wave 7 Guardian x2 Subteroth x2
Wave 8 Corrupterx4 Despoiler x1 Bulwark x2
Wave 9 Guardian x2 Dispatcher x2 Corrupter x1 Boss
Subteroth– Explode when they die, hold off on these to give healers regen time.
Dread Guard Dispatcher– Force Lightning spam
Dread Guard Bulwark – Casts a shield that reflects all the damage from outside.
Dread Guard Corrupter – Casts Mass Affliction, needs to be interrupted
Guardian of the Fortress – AOE frontal cone, has a 2.5 second cast timer, Ravage with stun (can be CC broke).
Dread Guard Despoiler – Wave 6 and 8, hewwwals the adds and the boss, must be killed first or can be CC’d by sorcs and mercs.
Dread Guard Dismantler -Priority! Applies one shot debuff.
Sniper PoV Vid Sin Tank PoV Vid Sorc Heals PoV Vid
Grob’thok Who Feeds the Forge
This cybernetic rancor is a tank mechanic boss and does well with an AoE heavy group. Ranged DPS and healers can be fairly stationary as the boss is moved around the room.
Tanks –One tank takes the boss, for the first half simply tank the boss facing away from the raid, when he summons a pipe drag the boss into the magnetic claw moving around the room asap (repeats several times). This usually occurs at 80, 60, 40 and 20%.
The second tank gathers the adds that spawn so the dps can easily kill them. You can drag these adds into to lava to kill them also. .
Dps– Be aware of the Mining droid, it will target a random member of the raid and you will run around leaving behind a lava trail, Make sure to kite the trail out of the way of the rest of the raid (melee in particular). Groups of Ugnaughts will constantly spawn which need to be aoe’d down. The rest of the fight as far as we’re concerned is tank and spank.
Heals- Stay near ranged DPS. The tank with adds will periodically take high amounts of damage if they are using the lava trick.
We like placing the lava near the boss, between ranged and melee. This means melee can maximize DPS by staying near the boss and ranged AoE can quickly get rid of the adds. The timing off adds is every 30s, so rotate AoE’s between raid.
Sniper PoV Vid Sin Tank PoV Vid Sorc Heals PoV Vid
Corrupter Zero
*Concussion mine stacking debuff which causes you to do AOE damage to yourself and the rest of the raid. To cleanse this you must run right next to Corrupter Zero. (Random debuff).
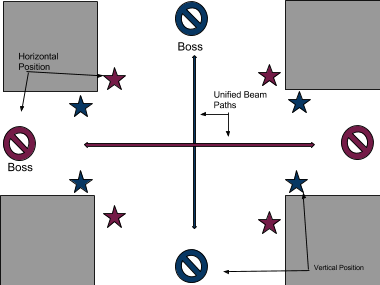
* Unified beam attack between 20-30% . Zero will leap into the air and drop to 1 of 4 locations and shoot the beam horizontally and vertically. LOS the attack on the opposite side of the walls. After each beam he rotates positions, so move to the other side of the corner.
*Missile Salvo Red reticle which knocks members down. Can be interrupted/stunned via Elite Add.
There are two phases, the add phase and the laser beam phase, followed by a burn phase at 30% or 3 minutes.
Tanks
Tank with your back to a wall. During phase 1, the tank swap is based on a stacking debuff (4 stacks). If you’re not tanking when adds spawn, pick them up (try and time a swap as the adds spawn so that you get a clean stack while the adds are burnt down and then re-swap once they’re all dead). There are two types of add groups that spawn, ranged and melee. If the melee group spawns, the off-tank can taunt and stack them together at which point the DPS can use their AOE. If the ranged group spawns, the adds will not move with a taunt, so go to them. The boss casts Gravity Field which needs to be moved out of.
Dps
There are two types of add groups that spawn, ranged and melee. If the melee group spawns, the off-tank can taunt and stack them together at which point the DPS can use their AOE. If the ranged group spawns, the adds will not move with a taunt and the DPS can still use their AOE’s (just not as effectively). On Zero, it is a tank and spank until Gravity Field is cast (move!). DPS should be on the lookout for a stacking debuff called Concussion Mine. This debuff deals constant AOE damage and the only way to cleanse it is to run within melee range of Corrupter Zero.
Heals
Phase 1 of this fight is fairly simple and AoE placement will mitigate healing pressure. Split tanks between healers for adds groups. Cleanse debuffs (on tanks).
Sniper PoV Vid Sin Tank PoV Vid Sorc Heals PoV Vid
Dreadmaster Brontes
Phase 1
Tanks
One tank should grab aggro on the Right hand and the other tank on the Left hand. The hands will apply a debuff called Touched (or something of that nature). At 80% and 60% the hands will cast attunement which attunes you to the right or left hand based on which you were tanking. Simply switch to the hand that you were not on and continue (Note – it’s important to make sure your dps know when it is ok to push the hand to the next phase otherwise you may end up with both attunements. A few hits will deal a significant amount of damage).
DPS
Attack two smaller Fingers of Brontes as a priority. Split DPS between larger Hand of Brontes. Dps needs to keep even as transitions occur every 80%, 60% and 40%. The Hands will then respawn at a different location. We will get them both to about 65% and stop until another set of fingers spawn, once we kill the fingers the tank will call to push the hand. If done too early the tank has overlapping tentacle attunements and takes significant damage. For the 60%-40%, DPS focuses right side first followed by left side. Fingers of Brontes can potentially spawn here, but strong DPS groups shouldn’t worry. You want to avoid adds so during the lightning transition there are no small Fingers up.
Heals
Stack with ranged DPS and split tanks.
In the transition here you will see 4 pairs of large Fingers spawn at the feet of random players. The weill begin to emit an AoE lightning around their base a before they shoot a large lightning beam between them. These simply need to be avoided by standing on the perimeter before Brontes respawns in the middle for the start of phase 2.

Phase 2
In this phase, Brontes will appear in the center of the room. Corrupted Kephess clones spawn in various locations 3 times.
*Energy Spheres- spawned adds with aggro to DPS (occasionally tanks) during phase 2. These need to be exploded by running into them between 15-19 stacks (buff on sphere). Give healers a 3 second count down.
Tanks
Brontes appears and should be tanked facing the red force field( to the left as you come in the room). Since no clones spawn in that area, it decreases raid cleave chance. Tanks switch after 4 stacks are applied. The tank with the stacks should switch to the corrupted Kephess clone add that spawns. Repeat until phase 3 (Note before the push to phase 3(50%) you can taunt the orbs that spawn and run into or pull them before the taunt ends to free up a dps)). During the transition, work ahead of DPS to gain threat on adds, one tank beginning on the last 4 adds.
DPS
Dps Brontes from 100%-50%. Arcing Assault is a cleave which will reach to the wall, so you need to be positioned behind. Energy Spheres throughout this phase and most of the time attach itself to a DPS. When this happens that DPS needs to tell the healers so that they can get topped off. Once the Energy Sphere has around 15 stacks on it the DPS should run into it. When corrupted Kephess Clones spawn, DPS him down. He also throws a nanite debuff. Healers should cleanse these but you can self cleanse/evasion/ect. Near the 50% mark, make sure all the add clones have been taken care of and push to the second transition.
Heals
Stack with DPS and AoE heal raid. Split tanks by who is staying with Brontes and who is tanking Kephess clones. Dispel nanites. One healer will heal player with Energy Sphere. The player will be taking noticeably more damage. Hold off on barriers until the dps begins countdown as it will mitigate damage most efficiently. The player needs to be topped of around 90%.
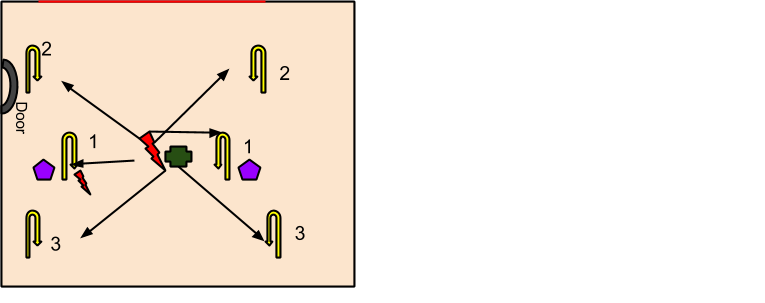
Phase 3
The transition here brontes will start a clockwise rotation with a large beam of lightning that creeps toward a set of adds. The goal here is to kill all of the droids, in order, before the lightning can touch them. Failure to do so results in an instant raid wipe. Also, the raid member that is closest to the droids adds gets aggro, so make sure you position accordingly.
**Use this phase to give healers time to top everyone off.

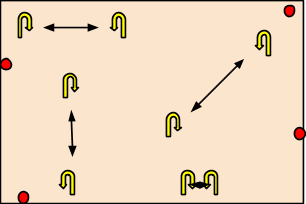
The small Fingers aggro via proximity. DPS and Healers must “tank” assigned Finger. Assign tentacle buddies so players from the first 3 tentacles can gain aggro and relieve players 4-6 by being closer to the Fingers after their own Finger is down. During this phase there will also be purple reticles which can deal around 12k damage. Avoid them while remaining in melee range.
Tanks
Each tank will tank one Hand. During this phase tank the Hand so that the path of the slam destroys the incoming Energy Spheres. These orbs cause massive damage and too many going through will result in a wipe. If you direct the tentacle to one corner it will automatically get whatever spawns behind you and allow you to only need to watch one corner and spin to that when it spawns an orb (keeping an eye on the minimap also helps).
DPS
Drop all aoes on Fingers 2 and 3 and then have everyone focus down 1 . Follow with 2,3,4,etc. It’s important to pop defensive cooldowns here such as sniper shield, saber wards etc as the damage going out is pretty significant. You will have a tentacle buddy that will step in when you are low and out of CDs. Be sure to communicate. It’s a bit of a mess but stay focused and follow the dps order. After all the fingers are dead we kill the hands right then left and push to phase 4.
Heals
AoE heals will only hit 2 people in the beginning of this phase. (Precast reviv as a sorc between yourself and the player next to you. I try and preload a 3 stack during the transition. Barriers are important.) If you are the healer whose Finger clears first, take a second to heal before picking up a DPS’s finger. After one side is clear AoE’s are easier to hit more players with. Split tanks as you will not be able to reach both depending on where they are kiting Hand slams.
Phase 4

Brontes will come down and heal to ~62. The raid should gather in the corner farthest from the door, near a hand. During this phase a stacking debuff called Manifest Supremacy goes out that will deal close to 10k dmg per tick at 20 stacks. To stop this, dps the first Hand until it produces a shield. Once inside the shield, debuffs are reset and you can and head back out to continue dps near the second tentacle. Once both shields are consumed its more or less a race to kill Brontes before we die.
Tanks
Do your best to have your back to a wall and make sure both tanks coordinate taunts as much as possible. When the raid reaches 5-6 stacks move to the shield that the hand puts up. Then make the transition to the other corner with the hand repeat above until 5-6 stacks then get under the shield and by this time Brontes should be nearing death.
DPS
Burn Brontes until you debuffs hit 5-6 stacks. DPS Hand until the shield pops. For final burn, make sure your back is to a wall, but not the same wall as tanks.
Heals
Use the shield phases to regen and get tanks topped off. During the last burn phases, damage is pretty heavy and you will get heals interrupted by knockbacks.
Sniper PoV Vid Sin Tank PoV Vid Sorc Heals PoV Vid