Introduction
If it’s your first time using Scholar, you may have no idea how to utilize its skills as a healer. With that being said, here is a comprehensive basics guide for the scholar beginners, which will tackle all the basics of the Scholar, its abilities, how its kit is utilized in party support abilities, specific playstyle information, and some dungeon tips you can use.
Scholar Requirements
Level up the Arcanist job to level 30
- Must have finished doing the Forgotten but Not Gone quest (can be unlocked by finding Murie at the Limsa Lominsa)
An Overview of the Scholar Class
Scholars are also referred to as barrier healers. After all, their powerful barriers are cable of diminishing damage. In addition, they can also heal with excellent off-global cooldown capabilities, use the faerie pet for healing assistance, and support the party with several skills and buffs.
Scholar Healing Abilities
Now, here are all Scholar’s healing abilities, including the respective levels where you obtain them.
Physick (Level 4)
A quick and affordable healing spell that does not provide shielding. This skill is a good option, especially when you don’t have other available options that you can utilize for your team.
Adloquium (Level 30)
This pricy spell offers you a shield with 125% healing and grants you Galvanize. Upon restoring critical HP, it will produce Catalyze and nullify damage equating to 125% of HP healed.
Succor (Level 35)
It is the first AoE heal you acquire from Scholar. Succor provides a healing effect similar to Adloquium, except that getting crits won’t provide you with an additional shield buff.
Although Succor provides excellent healing and shields, you should prevent overusing this spell due to its high MP cost.
Aetherflow (Level 45)
This is a resource that you would frequently use. After all, this ability restores 1000 MP and provides you with three total stacks of its namesake.
Lustrate (Level 45)
A quick, one-second recast heal that comes with 600 potency. You can utilize this skill if you have a minimum of one stack of Aetherflow.
Sacred Soil (Level 50)
This skill is considered one of the best AoE mitigation tools. Sacred Soil produces a zone on the ground and reduces taken damage by 10%.
At level 78, Sacred Soil is enhanced with a regen effect.
Indomitability (Level 52)
Indomitability provides the strongest AoE heal and costs one Aetherflow.
Deployment Tactics (Level 56)
This skill lets you transfer your Galvanize shield to another target that’s ten yards away.
Emergency Tactics (Level 58)
This skill converts the next Galvanize or Catalyze shield effect into heals of the same amount. Only the Adloquium and Succor skills are affected by this.
Excogitation (Level 62)
A strong buff that heals a target for 800 potency if their HP goes below 50 or upon expiration of the buff.
It is recommended to keep this buff on cooldown.
Recitation (Level 74)
Recitation allows you to use Adloquium, Succor, Indomitability, and Excogitation without spending any materials. In addition, this spell will also grant you with sure crits.
Faerie Abilities
Scholars have two faerie companions, namely, Eos and Celine. These faeries provide the same abilities and only differ in appearance. Here are their following abilities below and the levels in which they receive the respective skills.
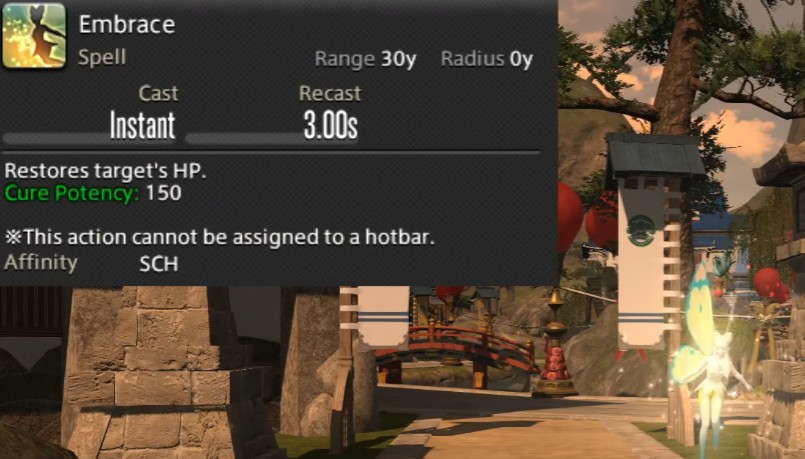
Embrace
Restores target HP.
Eos (Obtained By Default)
Does a quick heal on any target whose HP is below 80%. Although it provides low potency, it provides decent healing and does crits as well.
Whispering Dawn (Level 20)
It is a regen spell that provides 2520 potency and has a 21-second total duration.
Fey Illumination (Level 40)
This skill provides a prominent healing buff, increasing your healing by 10% to all affected party members. It also reduces magic damage taken by 5%. This scales with the item level of the member.
Aetherpact (Level 70)
This skill lets you attach your pet to any target to heal them. This skill can be executed as long as you have ten fairy gauge to maintain it.
Fey Blessing (Level 76)
A decent AoE heal that surrounds the faerie themselves and has a one-minute cooldown. It only costs ten faerie gauge.
Summon Seraph (Level 80)
This skill provides you with an upgraded faerie and grants you access to two more abilities: Consolation and Seraphic Veil.
Consolation works just like Fey Blessing but provides shielding along with heals.
On the other hand, Seraphic Veil works similarly to Adloquium by nullifying damage amounting to the same amount of HP healed.
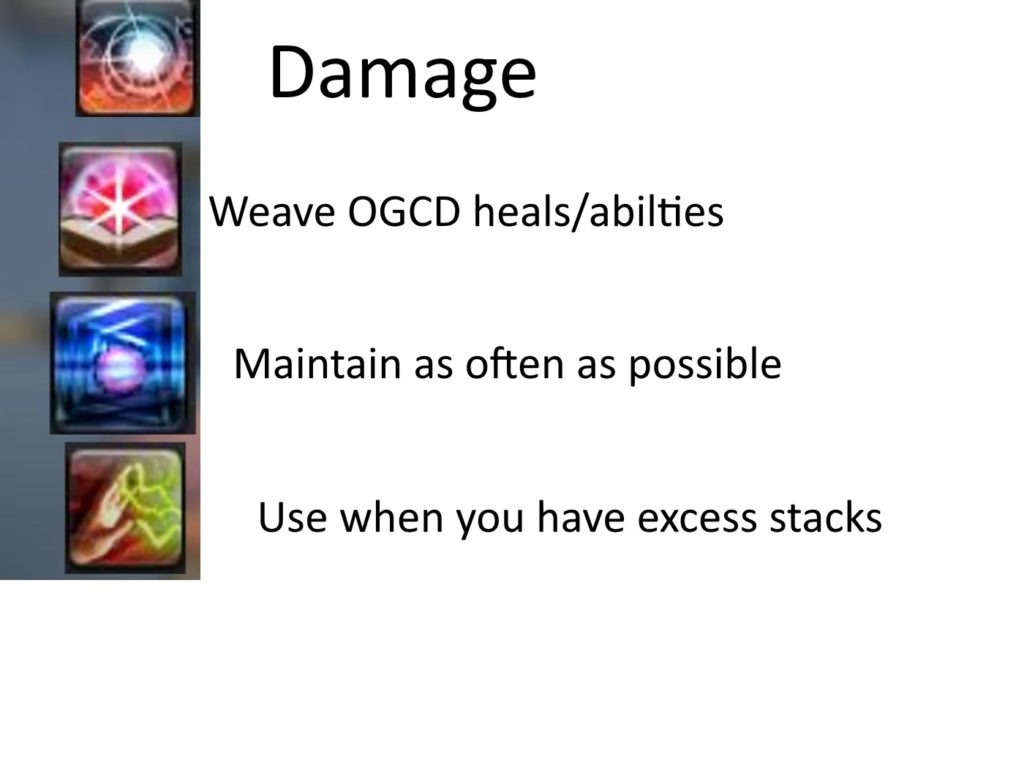
Damage Abilities
This guide will now tackle different damage abilities you can use as you play Scholar. These are the essential skills you should note when dealing damage below, including levels obtain the following skills.
- Broil III (Level 72): This serves as your primary damage-casting spell
- Biolysis (Level 72): An ability you should look to maintain 100% of the time
- Energy Drain (Level 45): A skill that deals unaspected damage. It is also an ability that you use to spend your Aether Stacks on for HP and MP regen.
- Ruin II (Level 38): A useful skill that deals unaspected damage and allows you to weave OGCD abilities and heals.
- Chain Strategem (Level 66): This huge party buff allows party members to receive a 10% crit hit rate on the enemy during its first duration.
Dissipation Ability
This ability doesn’t do healing or damage, but it is still a good ability you can use. After all, Dissipation provides a huge healing buff (20% increased healing). However, it only affects Physick, Adloquium, and Succor. It also does not buff up Aether skills. Still, using Dissipation will provide you with three Aether stacks.
Ideally, you can use Dissipation for two scenarios:
- During the beginning of a fight and after having spent your three Aether stacks for increased damage
- During critical moments where you need to use the Lustrate Skill continuously
Role Actions
As a scholar, here are some role actions you’d primarily use throughout your gameplay.

- Lucid Dreaming (Level 24): Regenerates MP
- Swiftcast (Level 18): Instantly casts a heal or a res when needed
- Esuna (Level 10): Used to dispel debuffs
- Surecast (Level 44): Prevents knockback effects
- Rescue (Level 48): Used to save a party member by bringing it beside you
Other Helpful Tips and Tricks to Take Note of

- Using an Aether ability (Lustrate, Indomitability, and Excogitation) will grant you ten faerie gauge.
- Always put a shield up on the tank as much as possible. However, don’t spam on Adloquium too much. Only refresh it when your MP allows while also focusing on your faerie to heal as you do damage.
- Make sure to use Lustrate and Indomitability as needed. On the other hand, you can use Succor if required for AoE heals.
- Always keep Excogitation up to save your MP pool.
- If you are not too comfortable dealing damage yet as a healer, simply focus on the basics, then work yourself up until you can deal significant damage.
Level-Bracket Playstyle Tips and Tricks
- At lower level dungeons (levels 15 to 30), your faeries should be able to handle the majority of the healing needed. You can also use a few Physick skills to keep everyone in the party healed.
- At level 30, you can finally get access to Adloquium. From there, you can cast it during pre-pools to ensure that the tank has a fresh shield all the time. Again, don’t spam Adloquium and only apply it whenever you can.
- Upon gaining Aetherflow, make sure to keep it on cooldown as much as possible. If Aetherflow’s cooldown is coming down and you still have one or two stacks of it, try using energy drain if you don’t have to do healing before using Aetherflow again. Alternatively, you can use Lustrate to spend the stacks.
- If you need to cast a Lustrate or Energy Drain ability, make sure to utilize Ruin II and cast the said abilities during the cooldown period. Again, always make sure to do casting.
- If you can already use Deployment Tactics, it’s recommended to put Adloquium on the tank before spreading it to your party using Deployment Tactics.
- Another amazing strategy is to place Adloquium on the tank and yourself on Aoe pools. From there, stand nearby the tank to deal damage and use Deployment Tactics to spread once their shield is used up. Doing this ensures that you spread another shield onto the tank.
- You can use Emergency Tactics during critical moments to keep your party up. It’s also ideal to use it for Succor for the AoE healing, but alternatively, you can also use it for Adloquium.
- At level 60, you can use Dissipation to do a bit of damage when required.
- Aetherpact can be used during healing while also letting you do some damage.
- Recitation can be used on Excogitation before pools or on Adloquium to generate a bigger shield.
- Instead of using Indomitability or Succor, you can simply throw in an Odd Fey Blessing. You can use Seraph once the big hits from the boss are incoming and get extra shields for AoE pulls.